


SSH (ang. secure shell) – protokół sieciowy zapewniający szyfrowaną transmisję danych, następca starego Telneta. Służy do terminalowego łączenia się ze zdalnymi komputerami, przesyłania plików, tunelowania oraz innych zastosowań. W środowiskach Uniksowych czy Linuksowych jest to w zasadzie standardowa usługa. W przypadku Windowsa musimy skorzystać z dodatkowych narzędzi. Najbardziej kompletnym wydaje się być Cygwin.
Instalacja daemona SSH
Jeśli mamy już Cygwina zainstalowanego, musimy się upewnić że zainstalowane zostały 2 pakiety:
- Admin -> cygrunsrv
- Net -> openssh
Następnie uruchamiamy Cygwina z prawami administratora (roota) [ważne] i wpisujemy:
|
1 2 3 4 5 6 7 8 9 10 11 12 13 14 15 16 17 18 19 20 21 22 23 24 25 26 27 28 29 30 31 32 33 34 35 36 37 38 39 40 41 42 43 44 45 46 47 48 49 50 51 52 53 54 55 56 57 58 59 60 61 62 63 64 65 66 67 68 69 70 |
$ ssh-host-config *** Query: Overwrite existing /etc/ssh_config file? (yes/no) yes *** Info: Creating default /etc/ssh_config file *** Query: Overwrite existing /etc/sshd_config file? (yes/no) yes *** Info: Creating default /etc/sshd_config file *** Info: Privilege separation is set to yes by default since OpenSSH 3.3. *** Info: However, this requires a non-privileged account called 'sshd'. *** Info: For more info on privilege separation read /usr/share/doc/openssh/README.privsep. *** Query: Should privilege separation be used? (yes/no) yes *** Info: Note that creating a new user requires that the current account have *** Info: Administrator privileges. Should this script attempt to create a *** Query: new local account 'sshd'? (yes/no) yes *** Info: Updating /etc/sshd_config file *** Query: Overwrite existing /etc/inetd.d/sshd-inetd file? (yes/no) yes *** Info: Creating default /etc/inetd.d/sshd-inetd file *** Info: Updated /etc/inetd.d/sshd-inetd *** Query: Do you want to install sshd as a service? *** Query: (Say "no" if it is already installed as a service) (yes/no) yes *** Query: Enter the value of CYGWIN for the daemon: [] *** Info: On Windows Server 2003, Windows Vista, and above, the *** Info: SYSTEM account cannot setuid to other users -- a capability *** Info: sshd requires. You need to have or to create a privileged *** Info: account. This script will help you do so. *** Info: You appear to be running Windows XP 64bit, Windows 2003 Server, *** Info: or later. On these systems, it's not possible to use the LocalSystem *** Info: account for services that can change the user id without an *** Info: explicit password (such as passwordless logins [e.g. public key *** Info: authentication] via sshd). *** Info: If you want to enable that functionality, it's required to create *** Info: a new account with special privileges (unless a similar account *** Info: already exists). This account is then used to run these special *** Info: servers. *** Info: Note that creating a new user requires that the current account *** Info: have Administrator privileges itself. *** Info: No privileged account could be found. *** Info: This script plans to use 'cyg_server'. *** Info: 'cyg_server' will only be used by registered services. *** Query: Create new privileged user account 'cyg_server'? (yes/no) yes *** Info: Please enter a password for new user cyg_server. Please be sure *** Info: that this password matches the password rules given on your system. *** Info: Entering no password will exit the configuration. *** Query: Please enter the password: *** Query: Reenter: *** Info: User 'cyg_server' has been created with password 'XXXXXXXX'. *** Info: If you change the password, please remember also to change the *** Info: password for the installed services which use (or will soon use) *** Info: the 'cyg_server' account. *** Info: Also keep in mind that the user 'cyg_server' needs read permissions *** Info: on all users' relevant files for the services running as 'cyg_server'. *** Info: In particular, for the sshd server all users' .ssh/authorized_keys *** Info: files must have appropriate permissions to allow public key *** Info: authentication. (Re-)running ssh-user-config for each user will set *** Info: these permissions correctly. [Similar restrictions apply, for *** Info: instance, for .rhosts files if the rshd server is running, etc]. *** Info: The sshd service has been installed under the 'cyg_server' *** Info: account. To start the service now, call `net start sshd' or *** Info: `cygrunsrv -S sshd'. Otherwise, it will start automatically *** Info: after the next reboot. *** Info: Host configuration finished. Have fun! |
Właściwie cały proces instalacji przebiega automatycznie. Jedyne co użytkownik musi podczas instalacji zrobić to podać hasło dla nowo tworzonego użytkownika Privileged Server (cyg_server), na prawach którego zostanie uruchomiona usługa SSHD. Jeśli pojawiły się błędy radzę sprawdzić, czy polecenie faktycznie zostało wykonane z prawami administratora (roota).
SSHD wystartuje automatycznie po restarcie systemu, ale możemy go uruchomić także bez restartu poleceniem:
|
1 |
cygrunsrv -S sshd |
lub
|
1 |
net start sshd |
Teraz należy zakończyć pracę w konsoli z prawami administratora (roota) i przetestować nasz serwer. Ponownie więc uruchamiamy Cygwina i wpisujemy:
|
1 |
ssh localhost |
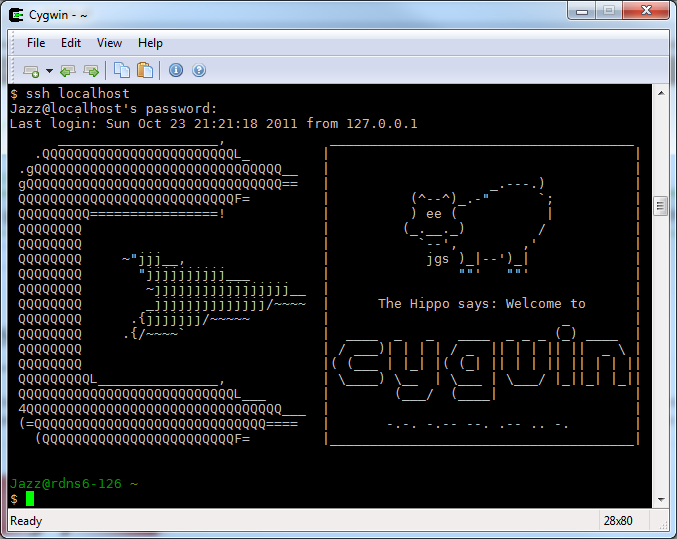
SSHD under Windows thanks to Cygwin
A więc serwer działa lokalnie, teraz musimy jeszcze otworzyć port 22 na firewallu, co zrobimy poleceniem wydanym z uprawnieniami administratora:
|
1 |
netsh advfirewall firewall add rule name=SSHD description="Secure Shell daemon" action=allow dir=in protocol=TCP localport=22 |
Prawie jak konfiguracja iptables w Linuksie 🙂
Na koniec proponuję jeszcze ukryć użytkowania Privileged Server (cyg_server) na ekranie logowania Windows, ale o tym w następnym wpisie.
Zabezpieczymy daemona SSH – instalacja DenyHosts
Mamy zainstalowany serwer SSH teraz należy zadbać o jego bezpieczeństwo. W tym celu zainstalujemy skrypt Pythona – DenyHosts. Program ten na bieżąco analizuje logi, pod kątem nieudanych prób logowania do serwera SSH i blokuje te adresy IP z których taki próby miały miejsce. Co więcej, DenyHosts pozwala na wymianę list trafnych adresów IP z innymi użytkownikami programu. To wszystko sprawia, że będziemy mogli spać spokojnie.
Instalacja DenyHosts nie jest tak prosta pod Cygwinem jak pod Linuksem, dlatego przedstawię tutaj całą instytucję krok po kroku.
Pierwszą rzeczą jaką musimy zrobić to damona logów systemowych. Upewniamy się, że zainstalowany został pakiet:
- Admin -> syslog-ng
Następnie uruchamiamy Cygwina z prawami administratora (roota) [ważne] i wpisujemy:
|
1 2 3 4 5 6 7 8 9 10 11 12 13 14 15 |
$ syslog-ng-config Creating default syslog-ng configuration files in /etc/syslog-ng Warning: The following function requires administrator privileges! Do you want to install syslog-ng as service? (Say "no" if it's already installed as service) (yes/no) yes The service has been installed under LocalSystem account. To start the service, call `net start syslog-ng' or `cygrunsrv -S syslog-ng'. Check /etc/syslog-ng/syslog-ng.conf first, if it suits your needs. Configuration finished. Have fun! |
syslog-ng wystartuje automatycznie po restarcie systemu, ale możemy go uruchomić także bez restartu poleceniem:
|
1 |
cygrunsrv -S syslog-ng |
lub
|
1 |
net start syslog-ng |
Teraz jeśli nie jesteś do końca przekonany o sensowności instalacji DenyHosts proponuję, zostawić komputer na jakąś godzinkę, po czym wydaj polecenie: cat /var/log/messages | grep invalid
|
1 2 3 4 5 6 7 8 9 10 11 |
$ cat /var/log/messages | grep invalid | tail Dec 3 14:22:57 rdns6-126 sshd: PID 3220: input_userauth_request: invalid user Clara [preauth] Dec 3 14:22:57 rdns6-126 sshd: PID 3220: Failed password for invalid user Clara from 222.151.212.210 port 60210 ssh2 Dec 3 14:23:00 rdns6-126 sshd: PID 5192: input_userauth_request: invalid user Claudia [preauth] Dec 3 14:23:00 rdns6-126 sshd: PID 5192: Failed password for invalid user Claudia from 222.151.212.210 port 32876 ssh2 Dec 3 14:23:05 rdns6-126 sshd: PID 4820: input_userauth_request: invalid user connie [preauth] Dec 3 14:23:05 rdns6-126 sshd: PID 4820: Failed password for invalid user connie from 222.151.212.210 port 33697 ssh2 Dec 3 14:52:34 rdns6-126 sshd: PID 5376: input_userauth_request: invalid user root [preauth] Dec 3 16:25:05 rdns6-126 sshd: PID 5664: input_userauth_request: invalid user root [preauth] Dec 3 17:59:02 rdns6-126 sshd: PID 4824: input_userauth_request: invalid user root [preauth] Dec 3 18:13:01 rdns6-126 sshd: PID 4004: input_userauth_request: invalid user root [preauth] |
Wystarczy? Wystarczy!
Tak więc dodajemy niezbędny w dalszej części pakiet:
- Python -> python
oraz pobieramy DenyHosts. Możemy to zrobić w konsoli:
|
1 2 3 4 5 6 7 8 9 10 11 12 13 14 15 16 17 18 |
wget http://surfnet.dl.sourceforge.net/project/denyhosts/denyhosts/2.6/DenyHosts-2.6.tar.gz tar zxvf DenyHosts-2.6.tar.gz cd DenyHosts-2.6 python setup.py install mv /usr/share/denyhosts/daemon-control-dist /usr/share/denyhosts/daemon-control mv /usr/share/denyhosts/denyhosts.cfg-dist /usr/share/denyhosts/denyhosts.cfg sed --in-place 's%SECURE_LOG = /var/log/secure%#SECURE_LOG = /var/log/secure%g' /usr/share/denyhosts/denyhosts.cfg sed --in-place 's%#SECURE_LOG = /var/log/messages%SECURE_LOG = /var/log/messages%g' /usr/share/denyhosts/denyhosts.cfg sed --in-place 's%#BLOCK_SERVICE = ALL%BLOCK_SERVICE = ALL%g' /usr/share/denyhosts/denyhosts.cfg sed --in-place 's%BLOCK_SERVICE = sshd%#BLOCK_SERVICE = sshd%g' /usr/share/denyhosts/denyhosts.cfg sed --in-place 's%LOCK_FILE = /var/lock/subsys/denyhosts%#LOCK_FILE = /var/lock/subsys/denyhosts%g' /usr/share/denyhosts/denyhosts.cfg sed --in-place 's%#LOCK_FILE = /var/run/denyhosts.pid%LOCK_FILE = /var/run/denyhosts.pid%g' /usr/share/denyhosts/denyhosts.cfg sed --in-place 's%#SYNC_SERVER = http://xmlrpc.denyhosts.net:9911%SYNC_SERVER = http://xmlrpc.denyhosts.net:9911%g' /usr/share/denyhosts/denyhosts.cfg sed --in-place 's%DENYHOSTS_BIN = "/usr/bin/denyhosts.py"%DENYHOSTS_BIN = "/bin/denyhosts.py"%g' /usr/share/denyhosts/daemon-control sed --in-place 's%DENYHOSTS_LOCK = "/var/lock/subsys/denyhosts"%DENYHOSTS_LOCK = "/var/run/denyhosts.pid"%g' /usr/share/denyhosts/daemon-control sed --in-place 's%PYTHON_BIN = "/usr/bin/env python"%PYTHON_BIN = "/bin/env python"%g' /usr/share/denyhosts/daemon-control cygrunsrv -I denyhosts -p /usr/share/denyhosts/daemon-control -a start -d 'CYGWIN denyhosts' -f 'Blocks IP addresses that attempt to brute-force SSH logins.' -y sshd -O cygrunsrv -S denyhosts |
Sprawdzamy teraz zawartość pliku /var/log/denyhosts.log, jeśli mamy szczęście zobaczymy:
|
1 2 |
$ cat /var/log/denyhosts.log starting DenyHosts: /usr/bin/env python /usr/bin/denyhosts.py --daemon --config=/usr/share/denyhosts/denyhosts.cfg |
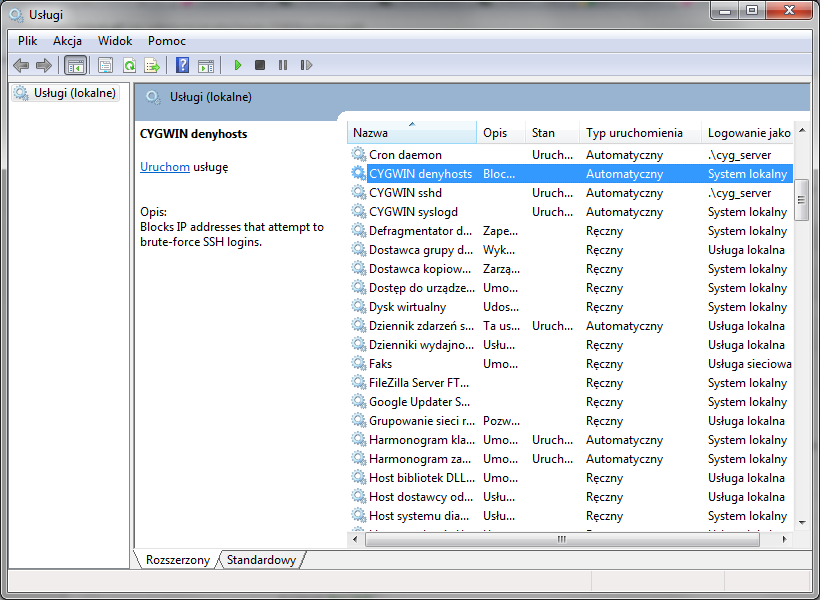
Oznacza to, że DenyHosts działa. Niech Cię nie zwiedzie, że w aplecie Usługi (Panel sterowania -> Narzędzie administracyjne -> Usługi) stan usługi CYGWIN denyhosts to Zatrzymano. Wynika to z faktu, że polecenie /usr/share/denyhosts/daemon-control z którego korzysta usługa Windows, jak sama nazwa wskazuje, jest skryptem kontrolującym daemona DenyHosts, a nie samym DenyHosts (/bin/denyhosts.py). Tak więc jego wykonanie z poziomu terminala / konsoli nie spowoduje jego zablokowania – daemon zostanie uruchomiony w tle.
Cygwin daemons
Ja nie miałem tyle szczęścia, w /var/log/denyhosts.log wyczytałem:
|
1 2 3 4 5 6 7 8 |
Traceback (most recent call last): File "/bin/denyhosts.py", line 164, in <module> first_time, noemail, daemon) File "/usr/lib/python2.7/site-packages/DenyHosts/deny_hosts.py", line 78, in __init__ self.get_denied_hosts() File "/usr/lib/python2.7/site-packages/DenyHosts/deny_hosts.py", line 272, in get_denied_hosts for line in open(self.__prefs.get('HOSTS_DENY'), "r"): IOError: [Errno 2] No such file or directory: '/etc/hosts.deny' |
Na szczęście rozwiązane tego problemu było dość proste:
|
1 2 3 |
touch /etc/hosts.deny chown jazz:root /etc/hosts.deny chmod 664 /etc/hosts.deny |
O poprawnym działaniu usługi przekonasz się monitorując zawartość następujących plików i katalogów:
/etc/hosts.deny/usr/share/denyhosts/data/*/var/log/denyhosts
W takim razie co może nie pójść po naszej myśli? W przypadku Windows Vista / 7 z zainstalowanym jakimś programem antywirusowym, w pliku /var/log/denyhosts.log może się pojawić coś w stylu:
|
1 2 3 4 5 6 7 8 9 |
0 [main] python 6140 C:\cygwin\bin\python.exe: *** fatal error - unable to remap \\?\C:\cygwin\lib\python2.6\lib-dynload\time.dll to same address as parent: 0x2B0000 != 0x360000 Stack trace: Frame Function Args 00288E68 6102749B (00288E68, 00000000, 00000000, 00000000) 00289158 6102749B (61177B80, 00008000, 00000000, 61179977) 0028A188 61004AFB (611A136C, 6124112C, 002B0000, 00360000) End of stack trace 0 [main] python 9048 fork: child 6140 - died waiting for dll loading, errno 11 abort: Resource temporarily unavailable |
W tej sytuacji musimy przeprowadzić operację zwaną po angielsku rebase. Upewniamy się, że zainstalowany został pakiet:
- Base -> rebase
Uruchomienie rebaseall jest dość niestandardowe. Otóż jedynym programem, korzystającym z biblioteki cygwin1.dll, który może być uruchomiony w trakcie wykonywania komendy rebaseall jest dash. W związku z tym, musimy zamknąć wszystkie procesy Cygwina i zatrzymać wszystkie usługi Cygwina. Uruchamiamy standardowy wiersz poleceń Windows cmd (nie Cygwin) po czym wykonujemy:
|
1 2 3 |
cd \cygwin\bin dash rebaseall |
Jeśli zobaczyliśmy coś takiego:
|
1 2 3 4 |
rebaseall: only ash or dash processes are allowed during rebasing Exit all Cygwin processes and stop all Cygwin services. Execute ash (or dash) from Start/Run... or a cmd or command window. Execute '/bin/rebaseall' from ash (or dash). |
Oznacza to, że został nam jeszcze jakiś działający proces Cygwina. W ostateczności możemy zrestartować komputer jeśli nie jesteśmy w stanie sprawdzić, który to i powtórzyć od zatrzymywania usług Cygwina.
W przypadku Windows 64-bit możemy natomiast spotkać się z takim błędem: FixImage (/usr/x86_64-w64-mingw32/sys-root/mingw/bin/libgcc_s_sjlj-1.dll) failed with last error = 13
Z kolei i tym błędem poradzimy sobie edytując plik: /bin/rebaseall, a dokładnie 110 wiersz, który pierwotnie wygląda tak:
|
1 |
sed -e '/cygwin1\.dll$/d' -e '/cyglsa.*\.dll$/d' -e 's/^/\//' >"$TmpFile" |
zmieniamy na:
|
1 |
sed -e '/cygwin1\.dll$/d' -e '/cyglsa.*\.dll$/d' -e 's/^/\//' -e '/\/sys-root\/mingw\/bin/d' >"$TmpFile" |
po czym ponownie uruchamiamy procedurę rebaseall.
Jest jeszcze jeden problem który musimy obejść – mianowicie zatrzymanie usługi nie skutkuje skasowaniem pliku /var/run/denyhosts.pid, a to z kolei powoduje, że nie można powtórnie wystartować usługi. Taka sytuacja ma miejsce po restarcie systemu, co jest szczególnie uciążliwe. Ten problem objedziemy uruchamiając Edytor lokalnych zasad grupy komendą gpedit. W edytorze przechodzimy do Zasad Komputer lokalny -> Konfiguracja komputera -> Ustawienia systemu Windows -> Skrypty (uruchamianie/zamykanie) -> Zamknięcie i tam dodamy prosty skrypt kasujący ów nieszczęsny plik:
|
1 |
del D:\cygwin\var\run\denyhosts.pid |
Tak, ja mam cygwina na dysku D:\.

Edytor lokalnych zasad grupy
Wszelkich wskazówek dotyczących rozwiązywania innych błędów, które mogą wystąpić przy instalacji DenyHosts nalęzy szukać w /var/log/denyhosts.log.